Overview
Requirements:fashare
· Internet upload speed of at least 2Mbps.
· The mobile operating system is Android 5.0+ or iOS 10+ version.
Firmware Upgrade Notes
Firmware updates are updates to the software system running on the camera.
Users can also manually check for updates in Camera Settings - Firmware Updates to upgrade.
- Notifications:
-
It will take a few minutes to download the installation package, please wait patiently.
-
When updating the firmware, please ensure the camera is powered on and the system running normally.
-
To ensure the using experience and the stability of APP function, please update to the Firmware to the latest version.
How to place and install the camera?
-
The camera needs to be connected to the power supply during use, and you need to choose the location of the camera according to the power location.
-
Keep the camera at least 0.7 feet/20 cm away from walls (or other obstructions) to avoid infrared reflections that affect night vision.
You can choose between the following two installation ways:
Place the camera on your desktop
Ceiling mount the camera
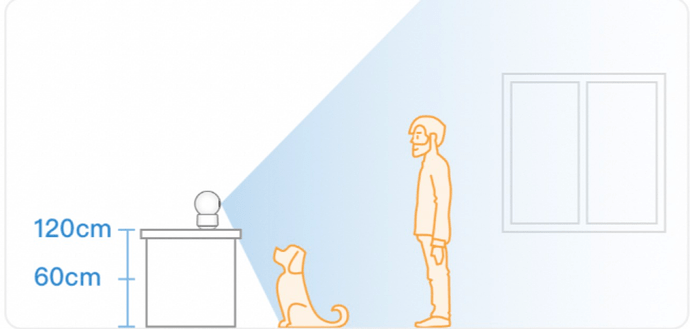
If you want to mount the camera on a table/shelf
Recommended height:
- If there are children or pets at home, you can place the camera at a height of 25-50 inches (60-120cm)
- If there are no children or pets at home, you can place the camera at a height of 40-60 inches (100-150cm).
Suggested Layout:
To ensure the picture quality and avoid overexposure of the infrared night vision; It is recommended that other objects around the camera should be kept at least 10 inches (25cm) away from the camera lens.
If you want to ceiling-mount the camera:
-
Before installation, please connect the camera to WiFi and App before installation.
-
When confirming the ideal installation position, please turn on the real-time video in time, and adjust the installation position according to the video shooting angle.
Required parts and tools:
Inside the box:
Power adapter, screws pack, mounting plate.
If the walls of your home are made of concrete, you will also need to bring your own electric drill, 15/64 (6mm) drill bit and Phillips head screwdriver. The recommended drilling depth is 30mm.
Suggested Layout:
In order to ensure the picture effect and avoid overexposure of the night vision infrared light; it is recommended that other objects around the camera should be kept at least 10 inches (25cm) away from the lens.
Installation Steps:
- Use an electric drill to drill holes at the marked drilling positions
-
Align the holes on the mounting base with the holes punched in the ceiling and insert the screws into the holes. with a Phillips screwdriver
-
Fix the screws to secure the mounting plate to the ceiling.
- Align the camera base with the slot and install it to ensure that the base is securely locked.
Suggested Angle:
You can rotate the camera on Holder page of App to keep the lens at a 30 degree angle to the horizontal for more accurate and intelligent detection of the detected area.
Camera calibrate:
Click the “Calibrate” Button at live video page to calibrate camera’s shooting angles.
Notification:
Since the camera is ceiling-mounted, the default picture is 180°inverted. If you have other special needs, or if you change it to the upright use state, such as placing it on the desktop, you can re-select it in the “Settings_Place Position” of the device.
If you need to mount the indoor camera on the wall
We recommend using mounting brackets (you need to bring your own), as shown in the following figure:
What does the color of the breathing light mean? How to turn it on/off?
-
Steady green light (for a short time): Camera is on
-
Steady green light (for a while): means the camera are facing some issues, please through Online Support to contact us.
-
Blinking green light: Waiting for network configuration
-
Blinking blue light: Camera is offline (including the state of being connected to the Wi-Fi and the state of disconnecting the Wi-Fi)
-
Steady blue light: Camera is online
-
You can turn on or off the breathing light through “Settings - Status light is on - Select On/Off”.
What is the function of the SYNC button?
Long press the SYNC button to reconfigure the network.
What does the small phone button on the camera do?
One-Touch Calling button, touch the button to establish a remote call and video call.
How to install a memory card? (Reuse app animation)
Memory card slot (pictured position 4)
Simply insert the memory card into the card slot. Press again to eject the card. Maximum support 128GB memory card
Does the camera have batteries?
The camera does not have a battery, and the power supply is always required to be used.


